With the COVID-19 pandemic, temperature checking before you enter a premise is a necessary step to ensure you are well and help keep others safe. In Singapore, it is a requirement from the government.
One of the most common way is to use a handheld digital thermometer to find out your own temperature and recording it on some kind of logbook placed near the front door. For a workplace, employees are encouraged to record their temperature twice a day.
This has two potential issues.
The first issue is the amount of surface a person come in contact with: thermometer, logbook and stationary used for recording.
The second issue is the logbook. It is a collection of papers printed with tables for people to put their entries. It could get very unwieldy as people need to flip through the papers to locate an empty slot if it’s their first entry for the day or their first entry of the day and record their temperature for the second time.
How are we going to solve this?
The general idea goes like this:
- Detect a face
- Check that the person is in the database
- If the person is in the system, record their temperature and create an entry with the current timestamp in the system.
- Otherwise, notify the admin of the unknown person via email with an attached form to register the person
- Once the person is registered, they will be checked-in.
- The data will be stored locally for future retrieval.
With the general idea in mind, the next thing to decide on is the hardware that we will be using to implement this solution.
There are many great options these days as computing technology has come so far: tablet such as an iPad, a Raspberry Pi, a Nvidia Jetson or even a decent laptop.
An iPad is an expensive solution. The cheapest model cost US$329. Furthermore, there’s only a limited set of hardware we can use with the iPad in order to capture and record temperatures. One such accessory is the FLIR ONE for iOS Personal Thermal Imager. This accessory is expensive, costing US$260 and is not necessarily available for purchase in Singapore without some kind of import restriction. However, it is something that probably requires the list amount of boilerplate work since Apple has created some of the best API for doing facial recognition and machine learning work.
Nvidia Jetson is another possible option. It cost about the same as a Raspberry Pi and comes with good software support. The hardware comes with a 128-core GPU that could easily churn through images and video feeds without any issue. There’s also a strong community support which could make it easier for us to search for information and troubleshooting issues.
Raspberry Pi ranks about the same as Nvidia Jetson in terms of price and purpose. However, there are a few aspects the Raspberry Pi, especially version 4, edged over the Jetson. The first is its faster, newer and more efficient CPU. The second is power consumption. The Raspberry Pi 4 consume at max 3.4 watt of power compared to 10 watt on the Nvidia Jetson. One could attribute that to the less powerful but efficient VideoCore by Broadcom on the Raspberry Pi. Lastly, it is the size. Nvidia Jetson is rather big due to its need to support a large heatsink and will need a bigger case to house it.
The Hardware and Software
Raspberry Pi 4 won out at the end because we don’t need to do heavy AI or robotic works the Nvidia Jetson is intended for. Furthermore, I could always reuse the Raspberry Pi again for future projects that are more general purpose. Lastly, it is also cheaper than an iPad with the FLIR camera accessory even after taking into account we have to buy the camera, sensor and housing.
Since I got the Raspberry Pi 4 as a hobbyist set from Labists, it came with Raspberry Pi OS. A quick setup process was all it needs to get started.
For the camera, I went with the Raspberry Pi’s NoIR Camera module to capture video feeds and do facial recognition. The initial reason for that was I had assumed it could pick up on temperature difference. However, I was proven wrong when further research suggested that the lack of IR filter on the camera was to allow it to see better in low-light conditions. I saw an opportunity here. I could deploy this solution for use at night or in areas where there’s poor lighting.
Now that I needed a way to pick up temperatures more accurately, several hours of research pointed me to using an AMG8833 thermal sensor. I found one from SparkFun and it was readily available locally. There are other more powerful and probably more accurate thermal sensors or cameras such as the SparkFun IR Array breakout – MLX90640 but they cost more and some are out of stock.
Now that we’ve got the hardware figured out, we need to determine what kind of framework or software we can use for the facial recognition part.
I decided upon OpenCV as it was something I’m familiar with and it comes with good support for the Raspberry Pi. A quick google search will give you a number of results.
The latest version of Python 3 (v3.9 at the time of writing) was used.
The following libraries were also installed to reduce the need to write boilerplate codes just to get the facial recognition functionality working:
Implementation of the facial recognition, thermal reading and check-in
You can see the architecture diagram for the solution below.

From the architecture, we can see that there are two facial recognition-related modules running on the Raspberry Pi. I implemented them based on the solutions provided by Adrian Rosebrock at his website.
For detection of faces, the Haar Cascade classifier is used with KNN classification algorithm.
The Face/Name Detector is responsible for building up the face/name store which will then be used for the check-in via face identification later. It scans a specific folder. Within this folder, there are sub-folders that are named after the person which contains his or her pictures. Below is an example of the folder structure.

The Face Recognition with Check-in module is as its name suggested. It pulls the feed from the camera and check each frame for a face. Once it found one, it will check against the face/name store. Only then, it will read the temperature detected by the thermal sensor and proceed to record the person into the temperature store, which is nothing more than a .csv file.
When it comes to the thermal sensor, I relied on information gleaned from this site. The GitHub repo provided us with the source code necessary to work with the sensor and formed the basis of my implementation.
Once the system detects a face that is known and their temperature recorded, the system will store it in the temperature store. Below you can find the flowchart that describe the execution.

And for those who like to read the source code to the project, it could also be found here.
Building the housing
I had a rough plan for how to house the hardware. It goes like this:
- Need a compartment to house the Raspberry Pi
- Camera should be placed high enough
- Thermal sensor should be able to see
- It should hold a display.
There is always the option of using a 3D printer but I knew it would probably take me way too long to figure out how to put everything together. So I went with the one thing I know: LEGO. It gives me the flexibility to change my design whenever the situation demands it while also giving me the power to make whatever I want. All I needed was the right kind of bricks and the right amount.
Below is the first prototype. Its sole purpose was to house the camera and Raspberry Pi.


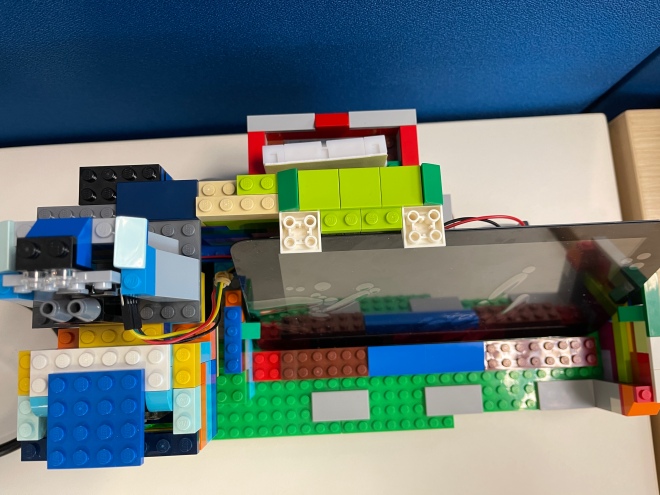
The above design cannot scale but it gives me the foundation to go further. I changed the Raspberry Pi housing and added more compartments to house the 7inch touchscreen display and thermal sensor.


It was during this time when I realised I’m lacking the right type of jumper cables to wire up the display to the Raspberry Pi. I brought out the breadboard I purchased before to use it as the connection hub. I build a separate compartment to house the breadboard which would be used to connect all the components together via wires. So this is how the following design came about.

Testing
Since this is meant as a prototype and learning purpose, I didn’t get around to do unit testing and all that stuff. My focus was only on getting things to work. I only did some application test to make sure whatever I’ve implemented was working.
Since I was developing primarily on my Macbook Pro, I tested the face identification implementation on it with the webcam as the source of the video feed before deploying it onto the Raspberry Pi.
After the thermal sensor was installed, I got to see for myself the effectiveness of the thermal sensor. The reference repo contains two example Python modules (IR_cam_interp.py and IR_cam_test.py) that I could use to check if the thermal sensor was working.
Using the modules, the sensor could pick up my skin temperature to be around 34 degrees celsius at about 10 cm. Going slightly further away at 15 cm, the temperature detected dropped to about 33 degree celsius. Any further, it becomes harder to get a more accurate read without some kind of offset value added. Thus far, I tried 2.5, 6.0 and 8.0. The latter gave the best accuracy. But this also meant that placing the thermal sensor at the top of the camera isn’t really a good implementation.
What’s next?
Since the thermal sensor don’t give very precise reading for faraway object like a human body, another approach is required. Below you can see a drawing of the improvement that I could make.

Other than that, the solution is also lacking the ability to register a new/unknown person into the system via some type of web interface or from another computer. What I did was to manually upload the pictures and run the Face/Name Detector to build the database.
Last but not least, I could also consider adding a backend support via Microsoft Azure to collect the recorded temperature, alerting users to new unknown users and to enable downloading of the stored record.
